Monday, February 23, 2009

Use of different Purchase order types

  • Standard Purchase order: This type of PO is used when you know the Item, Price, Delivery Schedule and payment terms. Most of the time Standard PO is used to fulfill sporadic demands or say demand coming once or twice a year. In this type of PO you are committing a purchase of item/s with particular quantity and particular price at particular shipment schedule.
For example
    • Purchasing for any specific event happening in Company
    • Where purchasing item/s is one time job.
  • Planned Purchase Order (PPO): This type of PO is used when you are not sure about the exact delivery schedules but other details are quite clear (like Item, Quantity, Price, approximate Delivery Schedule and Payment Term). For PPO Need-By-Date has to be entered, but this date will be treated as tentative date only. Once you are sure about the delivery schedule you create releases against this PPO with detailed delivery schedule. In this type of PO you are committing a purchase of item/s with particular quantity and particular price but with tentative shipment schedule. When you make a release, you are committing the delivery also.
For example
    • You need 1200 notebooks yearly, so you can raise PPO with quantity 1200 and in shipment details you can have shipment schedule as per your need (Say 12 shipments with 100 quantity each). This will be tentative schedule, you need to generate a release as and when you need the good and supplier will provide you material.
  • Blanket Purchase Order: This kind of PO is used when are not sure about quantity, price, delivery schedule. As soon as you select PO type as Blanket Purchase Agreement the fields for quantity  gets disabled. Blanket PO can be based on max agreed amount. Exact quantity Delivery Schedule and price will be informed to supplier by creating Blanket releases against blanket PO. You can have different ‘Price Breaks’ and specify the quantity / discount / effectively details. In this type of PO you are not committing your supplier at the time of creating PO, all the commitments are done when release is sent.
For Example:
    • A car manufacturer needs dashboard for each vehicle and it is purchased from selective suppliers only. But demand for dashboard is not clear. In this case Blanket PO is used and whenever demand comes, releases are sent to supplier.
  • Contract Purchase Order: This type of PO is used when you are not sure even about the item which need to be purchased J. The only information that you provide in a Contract PO is supplier, supplier site, payment terms and agreement control details (header part only). Standard PO are created by referring the Contract PO when some thing is to be purchased against the Contract PO from that supplier.
For example:
    • You need to import many items to run your business, but you don’t have Import/Export license. In this case you create Contract PO with supplier who has Import/Export license and whenever you need something to be imported, you generate standard PO referring the Contract PO for that Item/s.
Out of above 4 types you can add only Blanket and Contract POs in Approved Supplier List (ASL).
This is applicable for Oracle EBS only...


Wednesday, February 4, 2009

Back-to-Back Order Cycle

In today’s environment where lead times are often only a matter of 24 hours, many companies want to create a specific supply order linked to each customer order and they want these supply order created as soon as the customer orders have been booked. These companies want to have the supply order “hard pegged” to the customer order that it is supplying, and once the supply reaches the warehouse they do not want it inadvertently taken by another order or demand. They also need visibility to where the Sales Order line is in the process at all times, so they can answer customer service inquiries. We call this process ‘Back-to-back orders’, indicating that the Sales Order and the supplying Purchase Order are very closely linked, often where one PO is tied to one Sales Order.


Key Business Drivers
  • Lower inventory cycle time and cost
  • Link supply to specific demand
  • Can offer a variety of product to customer
  • Used heavily in contract manufacturing environment where the product is standardized and the company plans to focus more on product design rather than manufacturing.


  1. Create a B2B item :
    • In the Order Management tab, check the Assemble to Order flag (ATO).
    • In the Purchasing tab, enter a value in the List Price field (in this demo it is 100).
    • In the Work in Process tab, make sure the Build in WIP flag is checked.
    • In the General Planning tab, set the Make or Buy flag to Buy.
    • Save, and assign to Organization M1
Note: the ATO item attribute is checked as the B2B process utilizes the ATO process of the workflow. However, the item is not manufactured in WIP, and instead is a 'Buy' item that is replenished by a supply order in PO. Hence the item may also be called an ATO Buy item


  1. Assign the item to the price list
  1. Make sure the following periods are open:
    1. Inventory Accounting Periods
    2. Purchasing Periods
    3. GL Period
  1. Create a sales order with Order Type Mixed and enter the B2B item in the lines for any quantity.
  • Keep Source Type=Internal. (If it is External then it will be a Drop Ship order)
  1. Book the order. Note down the Order Number. Booking will progress the order line to workflow activity “Create Supply Order – Eligible”.
  • The line status will move to Supply Eligible (flow_status_code SUPPLY_ELIGIBLE)
  1. Place cursor on the line and go to Actions > Progress Order. Select Create Supply Order - Eligible to progress the workflow of the line.

    This will insert the data into Requisition Interface table as well as progress order line workflow to SHIP_LINE activity.
  • The line status will now show PO-ReqRequested (flow_status_code PO_REQ_REQUESTED)
  • OM has inserted a record in the PO requisitions interface table.
  • Check reservation status: Go to Tools > Scheduling > Reservation Details > 'Supply' tab. Right now it is Inventory as Requisition is not yet created.
  1. Go to Purchasing > Reports > Run and run the concurrent program Requisition Import with the Import Source parameter = CTO (or blank). Leave the other parameters as default. The concurrent program can also be run from OM > Orders, Returns > Requisition Import


  • The line status of the sales order line will now show PO-ReqCreated (flow_status_code PO_REQ_CREATED)

  • Creation of requisistion also create data in MTL_RESERVATION table, with supply_source_line_id = requisition_line_id and demand_soure_type = requisition.
  • Check Reservation status: Go to Tools > Scheduling > Reservation Details > 'Supply' tab. As the requisition has created now the supply for reservation changes
  1. Go to Purchasing > Requisitions > Requisition Summary.
  • In the Find Requisitions window, enter requisition number found in the previous step and click on Find.
  • Verify that the status is Approved Requisition must have status APPROVED as we ran Req. Import with Requisition approval initiation= Yes
  1. Go to Purchasing > Autocreate.
  • From Edit > Clear > Record, clear any query criteria that may be defaulted.
  • Enter requisition number and click Find.
  • Check the checkbox to the left of the line, and click on Automatic.
  • Enter the Supplier and Supplier site such as the following and click on Create
  1. The Purchase Order form will automatically open with the PO that got created.
  • Click on the Approve button.
  • Click on the OK button in the Approval Documents window to approve the PO.
  • Note down the PO number, and verify that the status is Approved
For More details also Refer: Requisition to Pay Cycle
  • The line status of the sales order line will now show PO-Created (flow_status_code PO_CREATED).

  • Once PO got approved MTL_RESERVATION table got updated with supply_source_line_id = PO_LINE_ID and demand_soure_type = PO 
  • Check Reservation status: Verify that the order line is reserved against the PO.
  1. Go to Purchasing > Receiving > Receipts.
  • Enter Purchase Order number and click on Find.
  • In the Receipts window, check the checkbox to the left of the line and enter
    1. Destination Type : Inventory
    2. Subinventory : FGI
    3. Save the receipt.
  1. Go to Purchasing > Receiving > Receiving Transactions Summary.
  • Enter the Purchase Order number and click on Find.
  • Click on the Transactions button.
  • Verify a Receive and Delivery transaction. This means that the B2B item has been received into Inventory.
  • The line status of the sales order line will now show Awaiting Shipping (flow_status_code = AWAITING_SHIPPING)
  • Check Reservation status: As the material is now in FGI sub-inventory, supply changes to Inventory.
  • Check Shipping status of Order on shipping Transaction Form.
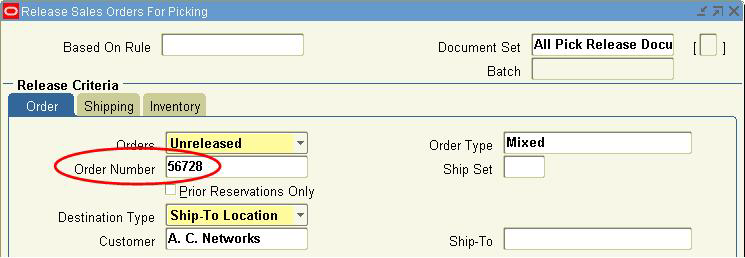
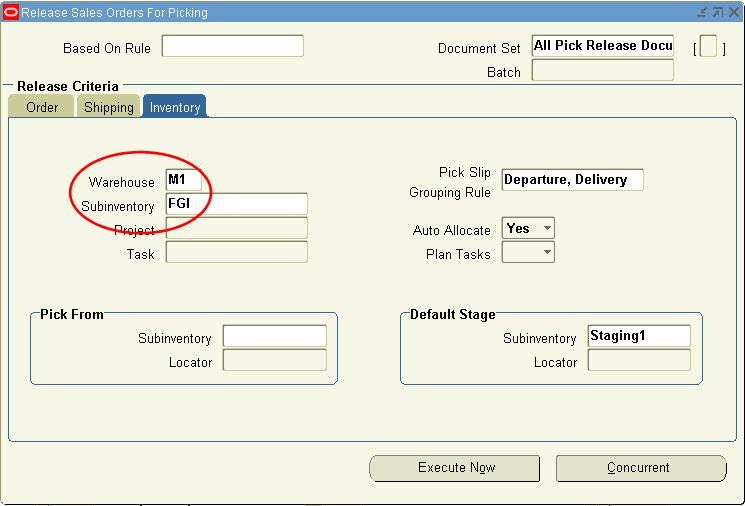
  1. Pick Release the Sales Order
 
 .

  • Make sure all the concurrent program gets completed successfully.
  • Check Shipping status of Order on shipping transaction form.
  • Check Line Status on Order.
  1. Now the Line is eligible for Shipping Activity. Ship Confirm the Order and verify the line status.
  1. Go ahead with invoicing the Order Line/s.
  2. In this case there will be two invoices.
    1. One in AR which will be issues against Sales Order
    2. One in AP which will be issued against Purchase Order / Receipt.
Managing Changes in Purchasing
  • Changes to a requisition (other than requisition cancellation) will NOT be reflected in the reservation to the sales order. Therefore, it is recommended that users never change a requisition with source type CTO. 
  • If the PO is canceled without canceling the requisition, the reservation is transferred back to the requisition. If both are canceled, the reservation is removed. In the latter case, you can run the autocreate purchase requisition batch program to create a new requisition for sales order.
  • If a partial PO quantity canceled, or the PO qty is reduced, then the reservation quantity is reduced accordingly. Again, run the autocreate purchase requisition batch program to create a new requisition for the outstanding quantity.
  • Receive an Assembly: When a purchase order has been reserved to the sales order, the inventory will be automatically reserved against the sales order when you receive the purchase order.
  • Once a sales order reservation to the PO has been removed (either automatically or manually), it cannot be manually re-reserved. You can manually reserve on-hand stock to the sales order or the autocreate purchase requisition batch program can pick it up again and create a new supply order along with a new reservation.


If for some business reason customer needs to cancel the PO and requisition, in such a case Cancellation of PO result in deletion of the complete record from MTL_RESERVATION table and also B2B order line workflow rewind back to “Create Supply Order – Eligible” workflow activity , also flow status code on OE_ORDER_LINES_ALL updated back to "Supply Eligible"
Now if user cancel the requisition and once again progress the workflow it result in creation of new requisition ( via requisition import) and now record in mtl_reservation table.


Also refer a White paper on Back 2 Back order. Metalink Doc ID 396951.1


*For better visibility CLICK HERE.

Requisition to Pay Cycle (Procure to Pay) in Oracle

*For better visibility Click Here
  1. Go to Purchasing > Requisitions > Requisition Summary.
  • In the Find Requisitions window, enter requisition number found in the
    previous step and click on Find.
  1. Go to Purchasing > Autocreate.
  • From Edit > Clear > Record, clear any query criteria that may be defaulted.
  • Enter requisition number and click Find.
  • Check the checkbox to the left of the line, and click on Automatic.
  • Enter the Supplier and Supplier site such as the following and click on Create

  
If you are doing it first time for the selected items or due to some problem your regular supplier is not in condition to supply goods. In that case you might need to go for RFQ (Request for Quotation) and then depending on quotations from different suppliers, PO will be released.
(Requisition -> RFQ -> Quotation -> PO/Release)
COMING SOON ! How to create PO from Requisition using RFQ & Quotaion
  1. The Purchase Order form will automatically open with the PO that got created.
  • Click on the Approve button.
  • Click on the OK button in the Approval Documents window to approve the PO.
  • Note down the PO number, and verify that the status is Approved


  1. Go to Purchasing > Receiving > Receipts.
  • Enter Purchase Order number and click on Find.
  • In the Receipts window, check the checkbox to the left of the line and enter
    1. Destination Type : Inventory
    2. Subinventory : FGI
    3. Save the receipt. 


  1. Go to Purchasing > Receiving > Receiving Transactions Summary.
  • Enter the Purchase Order number and click on Find.
  • Click on the Transactions button.
  • Verify a Receive and Delivery transaction. This means that the B2B item has been received into Inventory.


  1. Payables > Invoices > Entry > Invoices


-Enter the supplier, amount and other details.
  1. Match the invoice with Receipt or with PO. Open Invoice > Match (B) > Enter PO / Receipt Number > Find (B)


  1. Validate Invoice: Open Invoice > Actions… 1 (B)
  1. Verify Invoice Status:


  1. Create Accounting and initiate Payment: Open Invoice > Actions… 1 (B)

  • Enter Payment details and Save:
    

  1. Make Payment/s:

  
  • Review Payment: Payment Overview (B)
  
  1. Verify PO Status: