Bookmark and Share Subscribe You may face visibility problem if http://docs.google.com is blocked on your network

Tuesday, May 27, 2008

Serial Number Generation in Oracle Apps

Serial generation in Oracle Apps is based on the parameters defined for an Organization:

  • Serial Uniqueness
    • Within organization: Enforce unique serial numbers within the current organization
    • Within inventory model and items: Enforce unique serial numbers for inventory items
    • Across organizations: Enforce unique serial numbers throughout all organizations
  • Serial Generation
    • At organization level: Define the starting prefix and serial number information for items using the information you enter in the following fields of this window
    • At item level: Define the starting serial number prefix and the starting serial number when you define the item
  • Prefix
  • Starting Serial Number Parameter
  • Allocate Serial Number: Indicate whether the system will suggest serial numbers as part of the move order line allocating process. If you do not select this option, you must manually enter the serial numbers in order to transact the move order.

Case-1 In organization parameters Serial Generation='At organization level' and Uniqueness='Within inventory model and items'

INVENTORY> On-hand Availability> Generate Serial Number

Select Organization and generate serial number for different items.

The serial number value gets incremented for each serial generation irrespective of item

e.g.

  1. INVENTORY> Setups> Organizations> Parameters
  2. Define ‘Prefix= MFG’ and ‘Starting Serial Number Parameter= 0001’ in MFG organization parameters
  3. Define ‘Prefix= SER’ and ‘Starting Serial Number Parameter= 0001’ in SER organization parameters
  4. Select MFG organization
  5. INVENTORY> On-hand Availability> Generate Serial Number
  6. Run Serial Generation program for ABC with quantity=5
  7. Run Serial Generation program for XYZ with quantity=5
  8. Serial number ‘MFG0001 to MFG0005’ will be assigned to ABC
  9. Serial number ‘MFG0006 to MFG0010’ will be assigned to XYZ
  10. Select SER organization
  11. INVENTORY> On-hand Availability> Generate Serial Number
  12. Run Serial Generation program for ABC with quantity=5
  13. Run Serial Generation program for XYZ with quantity=5
  14. Serial number ‘SER0001 to SER0005’ will be assigned to ABC
  15. Serial number ‘SER0006 to SER0010’ will be assigned to XYZ

Case-2 In organization parameters Serial Generation=’At Item Level’ and Uniqueness='Within inventory model and items'

  1. INVENTORY> Items> Organization items Query the item and go to Inventory tab
  2. Define Serial ‘Prefix= Item-MFG’ and ‘Starting Number= 0001’ for ABC and XYZ item in MFG organization
  3. Define Serial ‘Prefix= Item-SER’ and ‘Starting Number= 0001’ for ABC and XYZ item in SER organization
  4. Select MFG organization
  5. INVENTORY> On-hand Availability> Generate Serial Number
  6. Run Serial Generation program for ABC with quantity=5
  7. Run Serial Generation program for XYZ with quantity=5
  8. Serial number ‘Item-MFG0001 to Item-MFG0005’ will be assigned to ABC
  9. Serial number ‘Item-MFG0001 to Item-MFG0005’ will be assigned to XYZ
  10. Select SER organization
  11. INVENTORY> On-hand Availability> Generate Serial Number
  12. Run Serial Generation program for ABC with quantity=5
  13. Run Serial Generation program for XYZ with quantity=5
  14. Serial number ‘Item-SER0001 to Item-SER0005’ will be assigned to ABC
  15. Serial number ‘Item-SER0001 to Item-SER0005’ will be assigned to XYZ

Tuesday, May 20, 2008

Oracle Pricing.... (Qualifier and Modifier)

Oracle Pricing (Qualifier & Modifier)

Oracle Advanced Pricing provides a logical, flexible setup framework to handle complex pricing scenarios. It enables to break price creation into simple elements: define pricing rules, assign rules to create specific pricing actions, and designate pricing controls. Oracle Advanced Pricing also supports tailored pricing with built-in extensibility features.
Oracle Advance Pricing is part of Oracle Order Management, and integrates seamlessly with other Order Management applications, including Configurator and Order Management.
REQUIRMENT: For customer Bigmart (Customer Number 1168) give 10% discount on the unit price of the items present on sales order.
To fulfill this requirement one Qualifier and one Modifier need to be defined.
Pricing qualifiers controls, who is eligible for certain prices (price lists) and benefits.
The modifier provides price adjustments such as discounts, price breaks, surcharges, coupons, item and term substitutions, and other item discounts. Discount and surcharges modifiers affect the selling price; freight charge modifiers do not affect the selling price.
Now first qualifier needs to be defined and at time of defining modifier this qualifier needs to be attached to the modifier. Qualifier qualifies the pricing request and modifier modifies that.
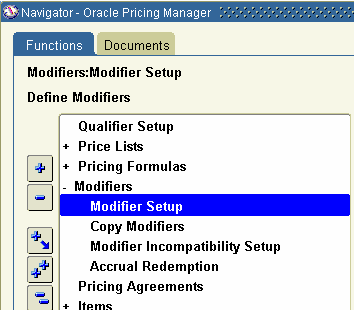
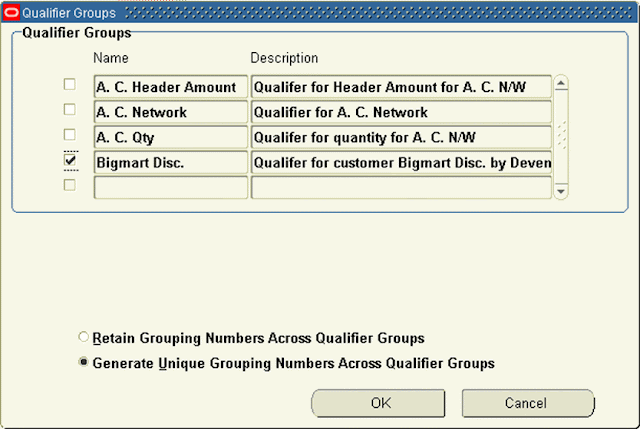
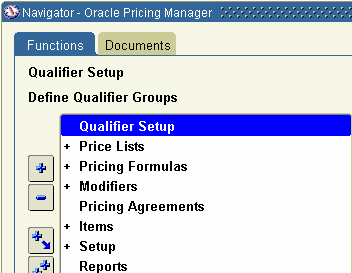
Define Qualifier: Bigmart Disc.


As this qualifier is newly defined we need to run one concurrent request “Build Attribute Mapping Rules”. This request needs to be run on defining new qualifier, it is always recommended to run the same after doing change in the qualifier.


Defined Modifier: Disc. Bigmart


The requirement is to give 10% to all the line. So select Level as ‘Line’ to apply modifier at line level. Even though it is for all the lines there is a difference in giving 10% discount at all lines level and giving discount at header level. If it would be at Header level 10% will be given to charges also along with items. Also provide all other values relevant to the requirement as shown.


>

Attach Qualifier to the modifier: Click on ‘Line Qualifiers’ button to attach “Bigmart Disc.” to “Disc. Bigmart”.


Sales Order 56771 is entered before creating the Modifier:


Sales Order 56772 is entered after creating the Modifier:


See the difference in prices at line level on two Orders. On sales order 56772 unit price is 1,439.10, which came after 10% discount on the real price (i.e. 10% discount on 1599.00) and on Sales Order 56772 unit price is 1,599.00

Friday, May 16, 2008

How to create configurable BOM..

BOM – Bill of Materials
for Configurable Item

*For better visibility open pictures in new window.

Navigation: BOM Responsibility> Bills> Bills

Notes: You can go into bill of materials and define / change the material control when you change items from being sourced internally to externally. The three main types that we use are,
Assembly Pull – this pulls this item from inventory when the top-level item is completed to stock.
Phantom – This causes the child components to be pulled. This is for items we build in house such as cable assemblies where we need to remove the raw stock but do not want to do a completion on the assembly.
Bulk - this is for items that you do not want to have back-flushed.


1. Enter the Assembly name and the components of the assembly.
  • Item Seq.: Enter the item sequence. The default value begins with “10” and increments in values of 10 but can be changed in the organization parameters.
  • Operation Seq.: Enter the operation sequence. All of the component items can have the same operation sequence value if desired or can reflect the operation number from the routing assigned to the BOM.
  • Component: Enter a valid component part number to be used in this assembly. Remember that this must be a valid inventory item that is BOM Allowed. If you are unsure of the exact part number, remember to use the “%” wild card.
  • Item Description: Will display the description for the selected component.
  • Revision: Will display the current revision of the component item.
  • UOM: Will display the primary UOM for the item in this organization.
  • Quantity: Enter the quantity required to make one each of this assembly.
  • Engineering Item: Checked or unchecked.


2. On this screen you can set the component supply types to any of the options above.


  • Supply Type: Can be Assembly Pull, Bulk, Operation Pull, Phantom or Supplier. Enter the appropriate choice for the BOM being created and will default from the Item Master. (For details of these types please goto end of this document)
  • Subinventory: Enter the subinventory where the component is normally stocked if different that the organization default backflush subinventory.
  • Locator: Enter the locator code for the component. If the backflush subinventory is under locator control, WIP cannot backlash without the locator code.
Note: If you have set the BOM Default WIP Supply Values for Components profile option to “Yes”; the values for these fields will default from the item master. If any of these values are left blank, Work in Process will read the values contained in the item master

3. Here you will find the nature of the item which plays role at the time of defining Configuration (BOM type of Items at Item Seq. 10, 20 & 30 is ‘Optional Class’)
  • Mutually Exclusive
  • Optional

  • Check ATP: A check indicates to perform an ATP (available to promise) check on the component. The default is enabled if the parent’s Check Component ATP attribute is “Yes”, the component’s Check ATP attribute is “Yes” and the component quantity is greater than zero.
  • Optional: Components are only optional on Model and Option Class bills. All components are mandatory on Standard and Planning bills.
  • Mutually Exclusive: This field is used in combination with the “Optional” field and applies only to Option class bills. This field determines the number of options that can be chosen when ordering this product.
  • Quantity: If a minimum sales order quantity is entered, a maximum sales order quantity must also be entered.


4. Create common BOM in other desired Organization


5. You can put optional class items under an “Optional Class”.

6. Find Indented Bill of an assembly


Supply type:
a) Push
Push components can be manually issued directly to discrete jobs and repetitive schedule as per requirements. You can specify the subinventory for items in Item definition form or in Bills or define default subinventory in WIP parameters form. Work in Process defaults the supply subinventory associated with the component.
b) Operation Pull:
Operation pull components that are assigned to backflush operations, are automatically backflushed (pulled) from inventory and issued to discrete jobs and repetitive schedules when assemblies are moved and completed at that operation i.e. when you complete backflush operations. Also, operation pull component that have not been backflushed because they are assigned to non-backflush operations prior to the backflush operation are also backflushed. The Components are pulled from the supply subinventory assigned to the component. You cannot assign this supply type to an assembly without a routing or a non-standard discrete job without a routing. You can assign this supply type to assemblies that have routing with no operations or when the routing has disabled operations. However, all components with a supply type of operation pull are automatically changed to assembly pull.
c) Assembly pull:
Assembly Pull components are issued (backflushed) to discrete jobs and repetitive schedules when you complete all operations on assemblies in Work in Process. They are pulled from the supply subinventory assigned to the component requirement.If you want to assign pull components to a bill of material or job that is not associated with a routing, you must assign an Assembly Pull supply type, rather than operation pull supply type. You cannot assign this supply type to a non-standard discrete job if you have not specified an assembly or bill of material reference for that non standard discrete job.
d) Based on Bill:
When you define a discrete job or a repetitive line/assembly association in WIP, the supply type for the assembly defaults to Based on Bill and assembly components are supplied based upon their bill of material supply types. You can change the defaulted Based on Bill supply type that is assigned to jobs and schedules as you define them. The Based on Bill supply type is WIP specific.If the supply type for a job or line/assembly association is changed, the new supply type is applied to all component material requirements. For example, if you change the supply type of a job assembly from Based on Bill to Assembly Pull, the supply types of all assembly components are changed to Assembly pull. You can update the supply types of individual material requirements using the Material Requirements window in WIP. The system automatically changes components with a supply type of Operation Pull to Assembly Pull, when the Based on Bill supply type is applied to a job or repetitive job/ schedule that has a bill of material but has no a routing or operations.
e) Bulk:
Bulk component requirements can be viewed and are displayed on reports and inquiry forms (that display components requirements) when you include Bulk components on a bill of material. They can be used to communicate to the shop floor that bulk components must be used but need not be transacted. You can choose specific components in the type field of WIP material transaction form for issuing bulk components.Bulk components are not backflushed nor do they default when issuing all components for an assembly. You can, however, manually issue specific bulk components to a discrete job or repetitive schedule. This supply type is selected for components like screws,nuts,bolts,nails,etc where it is difficult and may not be necessary to transact the exact quantity used.
f) Supplier/Vendor:
Supplier component requirements can be included on bills of material. Requirements for supplier components are created when you define discrete jobs and repetitive schedules in Work in Process. Supplier component requirements can be viewed and are displayed on reports. They provide information on the component materials that your suppliers provide but need not be transacted. Supplier components are not backflushed nor do they default when issuing all components for an assembly. You can, however, manually issue specific supplier components to discrete jobs and repetitive schedules/job.
g) Phantoms:
Phantom components can be assigned to bill of material component subassemblies and subassembly items in BOM and Engineering. Components of phantom subassemblies are used as if they were tied directly to the parent assembly. Phantom supply types cannot be assigned to jobs and repetitive lines/assembly associations in Work in Process. When model or option class bills are components to another bill of material, that component supply type is phantom.
Phantoms behave normally when they are top level assemblies, such as when master scheduled or manufactured on a discrete job. As subassemblies, they lose their distinct identity and become a collection of their components. Phantom components (not the phantom itself) are included on discrete jobs and repetitive job/schedules and are listed on the Discrete Job and Repetitive Schedule Pick List Reports

Tuesday, May 6, 2008

Data flow for Order-to-Cash cycle

1. Order Entry
This is first stage, When the order is entered in the system, it creates a record in order headers and Order Lines table.
  • Enter header details: Once you enter details on the order header and save it or move it to lines, record goes to one table oe_order_headers_all flow_status_code = ENTERED, booked_flag = N), Primary key=HEADER_ID
    • No record exist in any other table for this order till now.
  • Enter Line details for this order: Enter different item numbers, quantity and other details in line tab. When the record gets saved, it goes to one table. Order header details will be linked with line details by order HEADER_ID. oe_order_lines_all (flow_status_code = ENTERED, booked_flag = N, open_flag = Y) Primary key= LINE_ID
2.Order Booking
This is next stage, when Order is booked then the Flow status changed from Entered to Booked. At this stage, these below table get affected.
  • oe_order_headers_alL (flow_status_code as BOOKED, booked_flag updated to Y)
  • oe_order_lines_all (flow_status_code as AWAITING_SHIPPING, booked_flag updated Y)
  • wsh_delivery_details (DELIVERY_DETAIL_ID is assigned here, released_status ‘R’ ready to release, LINE_ID comes as SOURCE_LINE_ID)
  • wsh_delivery_assignments (DELIVERY_ASSIGNMENT_ID is assigned for DELIVERY_DETAIL_ID present in wsh_delivery_details, DELIVERY_ID remains blank till this stage)
*In shipping transaction form order status remains "Ready to Release".
At the same time, Demand interface program runs in background And insert into inventory tables mtl_demand, here LINE_ID come as a reference in DEMAND_SOURCE_LINE
3. Reservation
This step is required for doing reservations SCHEDULE ORDER PROGRAM runs in the background and quantities are reserved. Once this program get successfully get completed, the mtl_demand and mtl_reservations table get updated. LINE_ID gets updated in DEMAND_SOURCE_LINE_ID in both the tables.
4. Pick Release
Pick Release is the process of putting reservation on on-hand quantity available in the inventory and pick them for particular sales order.
Pick release can be done from 'Release Sales Order' form or 'Pick release SRS' program can be scheduled in background. In both of these cases all lines of the order gets pick released depending on the Picking rule used. If specific line/s needs to be pick release it can be done from 'Shipping Transaction form. For this case Pick Release is done from 'Release Sales Order' form with Pick Confirm=NO.
Once pick release is done these are the tables get affected:
  • If step 3 is not done then MTL_RESERVATIONS gets updated now.
  • wsh_new_deliveries (one record gets inserted with SOURCE_HEADER_ID= order header ID, status_code=OP =>open)
  • wsh_delivery_assignments (DELIVERY_ID gets assigned which comes from wsh_new_deliveries)
  • wsh_delivery_details (released_status ‘S’ ‘submitted for release’)
  • MTL_TXN_REQUEST_HEADERS
  • MTL_TXN_REQUEST_LINES (LINE_ID goes as TXN_SOURCE_LINE_ID)
  • (move order tables. Here request is generated to move item from Source (RM or FG) sub-inventory to staging sub-inventory)
  • Mtl_material_transactions_temp (link to above tables through move_order_header_id/line_id, this table holds the record temporally)
  • MTL_SERIAL_NUMBERS_TEMP (if item is serial controlled at receipt then record goes in this table)
  • MTL_SERIAL_NUMBERS (enter value in GROUP_MARK_ID )
*In shipping transaction form order status remains "Released to Warehouse" and all the material still remains in source sub-inventory. We need to do Move Order Transaction for this order. Till this no material transaction has been posted to MTL_MATERIAL_TRANSACTIONS
5.Pick Confirm/ Move Order Transaction
Items are transferred from source sub-inventory to staging Sub-inventory. Here material transaction occurs.
Order line status becomes 'Picked' on Sales Order and 'Staged/Pick Confirmed' on Shipping Transaction Form.
  • MTL_MATERIAL_TRANSACTIONS_TEMP (Record gets deleted from here and gets posted to MTL_MATERIAL_TRANSACTIONS)
  • oe_order_lines_all (flow_status_code ‘PICKED’ )
  • MTL_MATERIAL_TRANSACTIONS (LINE_ID goes as TRX_SOURCE_LINE_ID)
  • mtl_transaction_accounts
  • wsh_delivery_details (released_status becomes ‘Y’ => ‘Released’ )
  • wsh_delivery_assignments
  • MTL_ONHAND_QUANTITIES
  • MTL_SERIAL_NUMBERS_TEMP (record gets inserted after putting details for the item which are serial controlled at 'Sales order issue')
  • MTL_SERIAL_NUMBERS (record gets inserted after putting details for the item which are serial controlled at 'Sales order issue')
* This step can be eliminated if we set Pick Confirm=YES at the time of Pick Release

6.Ship Confirm
Here ship confirm interface program runs in background.
The items on the delivery gets shipped to customer at this stage.
  • oe_order_lines_all (flow_status_code ‘shipped’)
  • wsh_delivery_details (released_status ‘C’ ‘Shipped’, SERIAL_NUMBER if quantity is ONE)
  • WSH_SERIAL_NUMBERS (records gets inserted with the DELIVERY_DETAIL_ID reference, only in case of shipped quantity is two or more)
  • mtl_transaction_interface
  • mtl_material_TRANSACTIONS (linked through Transaction source header id)
  • mtl_transaction_accounts
  • Data deleted from mtl_demand, MTL_reservations
  • Item deducted from MTL_ONHAND_QUANTITIES
  • MTL_SERIAL_NUMBERS_TEMP (records gets deleted from this table)
  • MTL_SERIAL_NUMBERS (Serial number stauts gets updated CURRENT_STATUS=4 , 'Issued out of store')
7.Enter Invoice
After shipping the order the order lines gets eligible to get transfered to RA_INTERFACE_LINES_ALL. Workflow background engine picks those records and post it to RA_INTERFACE_LINES_ALL. This is also called Receivables interface, that mean information moved to accounting area for invoicing details. Invoicing workflow activity transfers shipped item information to Oracle Receivables. At the same time records also goes in the table RA_INTERFACE_SALESCREDITS_ALL which hold details of sales credit for the particular order.
ra_interface_lines_all (interface table into which the data is transferred from order management) Then Autoinvoice program imports data from this table which get affected into this stage are receivables base table. At the same time records goes in
ra_customer_trx_all (cust_trx_id is primary key to link it to trx_lines table and trx_number is the invoice number)
ra_customer_trx_lines_all (line_attribute_1 and line_attribute_6 are linked to order number and line_id of the orders)
8.Complete Line
In this stage order line level table get updated with Flow status and open flag.
oe_order_lines_all (flow_status_code ‘shipped’, open_flag “N”)
9.Close Order
This is last step of Order Processing. In this stage only oe_order_lines_all table get updated. These are the table get affected in this step.

oe_order_lines_all (flow_status_code ‘closed’, open_flag “N”)
oe_order_HEADERS_all

----------------------------------------------------------------------------------------------
Please add your valuable feedback / comments

Declaimer:

This blog is purely personal and the thoughts expressed here represent only me. The purpose of this blog is to share information and knowledge about Oracle's product which I have come across with my exposure to the product, practice and observations. The blog has been created keeping only one intention of sharing knowledge and for learning purpose. The blog has been created solely as a educational, for storing portions of the vast Oracle knowledge world. Oracle EBS is an Oracle Corp. product and you should contact Oracle directly for any specific fact or issue.

*NOTE: Few articles on this blog are not completely prepared by me, content is edited and complied after referring various sites to make visitor's job easy